Showing posts with label tutorial. Show all posts

Monday, February 3, 2014

Week 17: DIY Fabric Printing

A while back, this tutorial for Printing Your Own Fabric by Karina Manarin was featured on Poppytalk. Here is my attempt at it!

Materials:

Textile Ink - I didn't know exactly what counted as "textile" ink, so I asked at my local art store. They directed me toward this Jacquard Textile Color. It's essentially fabric paint, but it sets into the fabric nicely unlike that 3-dimensional stuff you used as a kid!
Contact Paper - For contact paper, I picked up some shelf liner from the dollar store. Either way, it's like one great big sticker.
Fabric - The fabric I used was 100% cotton canvas sample that my mom rescued from an upholstery shop that was going out of business.
Print Table - I created a makeshift padded table using some old towels and attaching them to my table top.
Foam - Instead of using the foam scraps to use in the paint, I used a regular foam brush.

Full tutorial and list of materials here.

For my first design, I cut out chevrons in a grid pattern, making sure to save my cutout pieces. I alternated between blue and yellow, but added a little punch of purple in there also. Can you see the spots I messed up? Yes, yellow and blue make green.


For my second one, I arranged the chevron pieces that I had cut out to achieve a pattern that I liked. This time I stuck to one colour.


What I enjoyed the most I love paint! And this is coming from a person who doesn't paint! And since I used a stencil, this project provided enough structure for my non-painting brain.

Next time I would... Try a smaller, more repetitive pattern. I don't think cutting a stencil would work as well for this, so maybe I'd try using a stamp.

Wednesday, September 25, 2013

Week 16: A Polkadot Apron Tutorial

I'm excited to finally show you my apron and show you how to make your own! I'm mostly settled into my new apartment now and am busy getting my new crafting area ready for some quality crafting time.


Materials:
-0.5m navy polkadot fabric
-0.75m bright pink fabric for band & strap
-scrap polkadot fabric for pockets
-2.5m of lace

Step 1: Cut Apron Pieces

Here are the measurements I used (length x width):

Top or 'Bodice' = 10" x 13"
Bottom  or 'Skirt' = 18" x 22"
Waistband = 76" x 4" (I pieced several strips together to get this length) Cut 2!
Neck strap = 20" x 3"
Pockets = 5" x 6"Cut 2!

Step 2: Trim

Round the top corners of the bodice piece and the bottom corners of the skirt piece.

With RIGHT sides together, trim the ends of your waistband on a 45-degree angle.

Step 3: Attach Lace


With right sides together, sew lace around the top and sides of the bodice using a zigzag stitch (seam allowance will depend on the width of your lace). Press seam to the inside and topstitch the edge, making sure to catch the seam underneath - this will keep your lace laying flat. Repeat for the bottom and sides of the skirt.

Step 4: Gather


Using a running stitch, gather a few inches on the bottom of the bodice and the top of the skirt. Stitch in place.

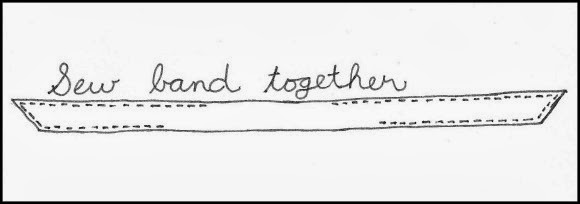
Step 5: Sew Band Together

With right sides together, sew the waistband pieces together, leaving an opening at the top wide enough for the bodice (approx. 13") and an opening on the bottom wide enough for the skirt (approx. 20"). Use a 1/2 inch seam allowance. Flip right side out and press.

Step 6: Piece the Apron Together


With right sides together, attach the bodice to the top front piece of your waistband and the skirt to the bottom front waistband. Use a 1/2 inch seam allowance. Press seams toward waistband.

Flip your apron over to the backside, and there will be two openings where the bodice and skirt pieces meet the waistband. Press the opening of the waistband under 1/2 inch. Pin in place so that the front waistband and back waistband are lined up. Then top stitch the entire edge of the waistband - this will close up the openings that were on the reverse side of the apron.

Step 7: Sew the Neck Strap


Fold the neck strap in half lengthwise with right sides together and stitch it up. Flip right side out, press and topstitch. (Okay, so topstitching is not totally necessary, but I'm so much happier with the end result when I do it!)

Step 8: Make the Pockets
Trim the bottom corners of the pockets to round them out.

Make a pleat down the middle of the pocket. Play around with pleats (or gathering) until you are pleased with the result. I ended up with a 1" wide pleat at the top and a 5/8" wide pleat at the bottom. Stitch in place.

With right sides together, sew the lace to the top of each pocket. Press the seam to the inside and topstitch.

Step 9: Attach Strap and Pockets
Pin your strap to the back side of the apron bodice. It's a good idea to try it on at this point and adjust the angle (or length!) of the strap to fit properly. Sew in place and reinforce by adding a second row of stitches 1/8" to 1/4" above your first row.

To attach the pockets, press under 1/4" along the side and bottom edges. Pin them to the apron skirt (again, try it on and adjust as necessary), and topstitch in place.

And now you have an adorable apron to wear whilst making pies or whatever your baking vice may be!


What I enjoyed the most: I really enjoyed making this apron pattern up as I went along. I am a fairly methodical type of person and like processes to be well organized. So it was a good exercise for me to freestyle my cutting, and not know where to place my pockets or how to attach the waistband. I just had to figure it out and make mistakes.

Next time I would...Play around more with the shape and maybe try a less conventional style of apron. I've made aprons before with a similar shape to this one, so maybe I should try something new? I'm intrigued by vintage aprons that look more like dresses and there are a few aprons worn by the maids on Downton Abbey that make me envious!

Wednesday, August 7, 2013

Week 15: Create A Bouquet of Paper Flowers

Keep summer alive all year with this paper flower bouquet! These were so easy to make -I'll definitely make them again!


I started playing around with a few different materials and was able to create the white carnation and yellow daisy on my own. For the blue roses and the red anemone, I found a couple of great tutorials: DIY Crepe Anemone by Craftberry Bush & Paper Flowers by Haute to Sew.

White Doily Carnation Tutorial:

Materials:
  • 9 paper doilies
  • washi tape
  • craft wire
Step 1: Fold each doily in half 5 times. Don't be too fussy with your folding. The main purpose is to add texture and dimension.


Step 2: Unfold your doily & poke a small hole in the centre

Step 3: Tape one doily to your wire stem.


Step 4: Layer all doilies onto the wire stem. Poke the wire stem through each doily and slide them up to the top.


Step 5: Secure with washi tape. You can use floral tape also -I just couldn't get it to work for me! I chose to continue with the tape down the entire stem for a fun look.


What I enjoyed the most: I enjoyed creating and designing my own paper flowers. I let the materials I was working with (doilies and twist paper) inspire me and I was pleased with what I was able to come up with.

Next time I would... Invest in some new paper. I just went with what I had in my paper drawer and luckily the colours I had worked. But next time I would like to go to the craft store and carefully select the papers and colour palette I'd like to work with.

Tuesday, July 30, 2013

Week 14: Simple Wall Art DIY

Painting is so not my forte, but I gave it a shot and ended up with this floral, pastel, geometric painting for my wall!


Supplies:
  • plywood
  • wood stain
  • cotton cloth
  • washi or painters tape
  • acrylic paints
  • paintbrushes

Step 1: Prepare the Plywood Canvas
I decided I wanted my plywood to be much darker in order to contrast well with my pastel palette of colours. So I stained my wood a 'walnut' colour before I started.

Step 2: Tape It Using my washi tape, I created some lines in a random criss-crossing pattern.


Step 3: Paint! 
Paint whatever you'd like! I must say that the final product was much different that what I originally had in my head. I expected it to be much more abstract, and much to my surprise, I had to remind myself not to be too detailed.


Step 4: Remove the Tape
Once your paint is fully dry, carefully remove the tape, being careful not to remove any extra paint.
And the tape was quite pretty too!


What I enjoyed most: I enjoyed experimenting as I painted. Being a novice, it was fun to accidentally discover what my brush could do.

Next time I would... Create something much more abstract. I think the wood lines would better compliment an image that was sort of a mish-mash of colours coming together.

Tuesday, July 23, 2013

DIY Garden Labels


Another garden DIY for you! When planting my garden this year, I went on a quest to find some garden labels. I was astonished by the lack of pretty options! I even went to several specialty garden shops. So, naturally I decided to create my own.

Materials:
  • wooden rounds with a 1 1/2 to 2 inch diameter*
  • drill
  • paint (again, I used my $1 mint-coloured mistint jar)
  • paintbrush
  • fine-point Sharpie
  • Mod Podge or other sealer
  • 12 gauge wire or larger (coat hangers work too!)
*I couldn't find any cheap wooden rounds, so I made my own by sawing 1/2 inch slices off a tree stick and giving them a quick sand


1. Drill a small hole in the top of each of the wooden rounds. 
2. Paint lines, triangles or other geometric shapes on your wood rounds. I free-handed it (surprisingly!) but use tape if you want more precision.
3. Once your paint has dried, use your Sharpie to print your vegetable names on each label. Go over your writing with black acrylic paint if you want a bolder look.
4. Apply a layer of Mod Podge or a poly sealer over all sides of your label to protect it from the elements.


5. Cut your wire approximately 18 inches long. Make a small semi-circle for your wooden round to hang on and then make a large semi-circle in the opposite direction.
6. Plant your label in your garden with the straight part of your wire digging straight down into the soil

Tuesday, July 16, 2013

Garden Fence DIY

Now that it's mid-summer, I'm sure many of you already have bountiful gardens that you've been working on for months. I'm an amateur gardener, but I decided to jazz up my little garden a bit this year. So I just thought I would share with you this week a few garden DIY's -like this dollar store garden fence remake.

Materials:
  • small garden trellis 
  • paint (I used a small misstint jar I bought for $1) 
  • paintbrush


I did one fairly thick coat of paint and did my best to cover the overlapping areas. I'm sure it would last longer if I used some sort of sealer to keep the wood in great condition, but I opted for this inexpensive garden project instead. With that said, my little fence is still looking great and it's already been rained on and even HAILED on a few times!


Wednesday, June 26, 2013

Week 12: Chocolate Bonbon Recipe & Tutorial

You sure are in for a sweet treat today! I'm going to show you how to make moulded chocolates with flavoured fillings.


You'll need:
  • chocolate moulding wafers
  • chocolate moulds
  • double-boiler
  • small paintbrush
  • small spoon
  • light corn syrup
  • margarine
  • vanilla or other extracts
  • food colouring
  • salt
  • icing sugar
Step 1: Choose your chocolate

  • I usually use moulding wafers, but I was in at the Duchess Bake Shop this week and sampled some amazing dark Valrhona chocolate and decided to splurge.
  • If you are a beginner, I highly recommend moulding wafers as they are much easier to work with and don't require tempering. Wilton's Candy Melts are a great choice.
Step 2: Select your moulds
  • I've been collecting moulds for a few years now and find that some of the simpler ones really are the best.
  • You can find moulds at Bulk Barn, Michaels and certain kitchen supply stores.
  • Make sure your moulds are deep enough for fillings -many are designed purely for moulding melted chocolate.
  • Select one mould for each flavour you are making so that you can tell your different flavours apart!
Step 3: Make your filling

  • Mix the ingredients above until you have a dough-like ball. A pastry blender is handy to begin mixing, but don't be afraid to use your hands!
  • If you are making several different flavours, then divide your filling into separate bowls. I made three: strawberry, peppermint and an experimental flavour, maple pecan.
  • Add your extract flavour of choice and a drop or two of food colouring. Mix until your ball of filling is all the same colour.
Step 4: Melt your chocolate

  • Melt your chocolate wafers in a double-boiler -I usually use a cereal bowl that rests nicely inside a small pot of water. Heat at medium-low heat and turn it down to low once the water is nice and hot. Be careful that no water or steam sneaks into your bowl of chocolate. Water and chocolate do not mix well! Once it is fully melted, remove from heat.
  • Alternatively you may start the melting process in the microwave, but I prefer the double-boiler method. It gives you more control and if you keep it in the pot of warm water, it is slower to harden and you can work with it longer without re-heating.
Step 5: Mould your chocolate

  • Using a small spoon (a baby spoon works great), scoop a small amount of chocolate into your mould.
  • Using your paintbrush, brush the sides and bottom of your mould in a nice thick layer. It seems tedious but it goes much faster after you've done it a few times!
  • Once all sides of your mould are covered, tap your mould gently on the table. This will help fill in the gaps, but will also release any air bubbles you may have.
  • You can wait until your chocolate hardens, but it's a long enough process already, so pop your tray into the freezer for about a minute.
  • When you take your mould out of the freezer, hold it up to the light and look through the bottom. If there are any spots where the light shines through your chocolate, then fill in those areas with your paintbrush. Then pop it back in the freezer to harden.
Step 6: Add your filling
  • Take a small spoon of filling and place it inside your chocolate-lined moulds. Use the spoon or your finger to gently push the filling down.
  • Leave about 1/8" of room at the top of your moulds for the chocolate.
Step 7: Top it off 
  • Spoon a small amount of chocolate into your moulds, on top of your filling. This will be the bottom of your chocolate when you're all done.
  • Alternate between gently tapping your mould and using your paintbrush until the chocolate fully covers your filling and looks smooth.
  • Don't worry if it spills over the edge a little bit as it can easily be cut off after you take them out of the moulds, but avoid over-filling.
  • Pop your tray of moulds into the freezer for 1-2 minutes, until the chocolate is fully hardened.
Step 8: Remove your chocolates from the moulds

  • Once the chocolates are set, turn your mould upside-down onto a flat surface lined with parchment paper and tap gently.
  • Be careful becuase if you are too rough, you may crack some of your chocolates.
  • The chocolates should slide out nicely, but if you have trouble, try returning them to the freezer for another minute. 
  • Admire your beautifully moulded chocolate!
(Optional) Step 9: Decorate!

  • For the peppermint ones, I melted some white chocolate and used the end of my paintbrush to embellish with polka-dots.
  • For the maple pecan ones, I brushed a bit of extra chocolate on top (as a glue of sorts) and sprinkled some crushed pecans on top.
  • I wanted to buy edible glitter for the strawberry ones, but had a hard time finding it. Instead, I purchased Wilton's shimmer dust. I just dabbed a little bit on the top of each chocolate. It's not as sparkly as I was hoping, but it did add a bit of colour. 
  • I tried to add the above embellishments first, by placing them in my mould before my chocolate, but the results were not effective at all. Add them after!
  • You can also drizzle a bit of white chocolate over your chocolates to make them look extra pretty, or get really fancy and try drawing or writing something on top of your chocolates.
Step 10: Package your chocolates

  • Handmade chocolates go very nicely in a handmade box.
  • For these, I found some great metallic cardstock on sale and created my own boxes. I tried a few testers with scrap paper to make my own unique box, but there are lots of downloadable box patterns on the internet that might interest you more. Like the one you'll find here.
  • I typically line my boxes with parchment paper before I place the chocolates in, but this time I created my own candy wrapper cups using a gold-spotted vellum paper. You can also buy candy wrapper cups (they look like mini-mini-muffin papers), but I find the colour options very sad.
Storing Chocolates
  • Contrary to popular belief, chocolates do not need to be stored in the fridge or freezer. In fact, storing them in the fridge or freezer exposes them to things chocolate does not like: moisture and odours. Moisture will make your chocolates lose their beautiful glossy look and chocolate can adopt any flavours/smells that it is exposed to, so be careful!
  • The best place for your chocolates is in an airtight container in a cool, dry place. 
  • The only time when the fridge/freezer is your friend is if you have a filling that will spoil. I usually make truffle fillings, which are cream-based and sadly, they went bad on me one Christmas. Oops!
What I enjoyed the most: I love making chocolates! But I really did enjoy the decorative touches I added this time. I was that much more proud of my final product. Also, I really enjoyed sharing this process with YOU! Awww....

Next time I would... Learn to properly temper chocolate. I had never really done it before and did my own version of the 'seeding' method and did it without a thermometer. I'm sure professional chocolatiers around the world are shaking their heads at me right now.

Tuesday, March 12, 2013

Week 9: DIY Jewelry Holder

This week my project was to create something using items from a hardware store. I created a jewelry holder using wooden pallet pieces, copper pipe fittings, teal wood stain, and some E-6000 glue.

I went to the hardware store and was full of inspiration after the first couple of aisles. But when I got to the aisle of copper pipe fittings, I just couldn't stop thinking about them! So rich in colour, so pretty, so shiny and not too expensive either. Most of the pieces I bought were less than $1. But what to make with them?


Once I found my way home from the store, I dug out a couple of pieces of pallet wood that we had stored in the garage.


I found 2 of the darkest, most rustic looking pieces I could find, and used the saw to chop them down to a reasonable size. I cut the boards between the rusty nails and wasn't too picky about making them the exact same length. Then I sanded the pieces down a bit - I didn't want them to be smooth at all, but just enough to get rid of the splintery-pokey-outy bits.


Next, I used a couple scrap pieces of MDF and screwed them on to the back of my pallet pieces to hold it all together.


Once it was in one piece, I went outside to stain it.  I was delighted to complete this step outside on a beautiful sunny day and it was only -4 degrees! Plus, the wood stain can cautioned me to work in a well ventilated area to avoid lead poisoning. Yikes!

I was so pleased to find this lovely small can of teal wood stain in the 'oops' section for just $1. I did a really light coat and made sure not to cover the wood completely.

After generously allowing a few hours of drying time, I arranged my copper pieces the way I wanted them. I used E-6000 to connect the copper to the wood and there is no chance of them falling off anytime soon. I piled a couple of pennies to add depth to one piece, but the glue was not the best at keeping the copper-to-copper parts together - I had to re-glue them.


Once the glue was holding tightly, I hung it on my wall and bam! A colourful spot to hang my jewelry.


What I enjoyed the most: I sure did have a fun time at the hardware store. An older gentleman employee approached me to ask if I needed help and I wasn't sure how he would react to: "I'm doing an art project and I'm not sure what direction to take yet." But he was great and offered lots of tips and ideas. Plus, now I've got a few ideas tucked away for next time!

Next time I would... Not use cheap screws! That one simple step took way too long!

Tuesday, February 19, 2013

Week 6: A Pin-Poppet


What started out as a seemingly simple project has sent me down a rabbit hole of questions and curiosities. 

Why the tomato and strawberry shape? Well, according to Wikipedia, during the Victorian era, it was a sign of prosperity and good luck to place a tomato on the mantle in a new home. When not in season, they would use red fabric filled with sand or sawdust. And as chance would have it, these little charms became a very practical place to store pins. 

Being extra resourceful, I thought I could reuse the stuffing from my old one. I cut it open expecting some tightly compressed stuffing or something, but inside was sawdust! Or at least I hope it was sawdust... Which led me to my next question.

What is the best stuffing for a pin cushion? I found many weird and wonderful answers: wool, flax seeds, lentils, pencil shavings, human hair, ground walnut shells, emery sand, and various pebbles you could source from a pet store. I was nearly sold on the ground walnut shells, but my tight purse prevented me from going out and getting some. 

I opted for a 3-tiered cheap method: 

  • rice - for weight and possible moisture absorbency
  • sawdust - for frugality and moisture absorbency
  • scraps of cotton quilt batting - for added softness and a smooth outer layer

I was inspired by some goldenrod-coloured rick rack I had kicking around, so I choose an outer fabric that would compliment. From my outer fabric, I cut 2 large circles, approx 5 1/2 inches in diameter. I then cut 2 medium circles (4 1/2 inches diameter) using scraps of cotton quilt batting. Lastly, I cut 2 small circles (3 1/2 inches diameter) of muslin. 


Using the small circles, I sewed them together with a 1/4 inch seam allowance and left a small opening. I stuffed the little pouch with rice, leaving some space inside so it was not too tightly stuffed, then I machine stitched it shut. 


Then I sewed the medium circles together leaving about a 2 inch opening (so I could fit the rice pouch inside of it). Then I flipped it inside out in hopes that it would help gain some height, stuck my rice pouch inside and stuffed the rest tightly with sawdust. Then I hand stitched so that very little sawdust (if any) would leak out. 


At this point, I could have put this medium sized pouch in my outer fabric and stuffed the rest with polyfil, but I didn't have any. Instead, I made yet another pouch from cotton quilt batting (cut approx 5 inch diameter) and put my sawdust/rice pouch inside. Then I sewed my outer fabric together, leaving quite a large opening, flipped it right side out and put my soft pouch inside. To seal it off, I handstitched the opening shut.


For decoration, I added a yellow button to the centre of the cushion (and one on the bottom too!), while maneuvering the stuffing toward the outside as much as I could. Lastly, I handsewed the rick rack on the perimeter, covering up the seam of the outmost layer.


What I enjoyed the most: I really enjoyed doing my research on this one. If I hadn't, I probably would have just stuffed it with scraps of quilt batting or something. Then it would have been too light, or worse - a needle-rusting haven!

Next time I would... Invest in some high quality stuffing like crushed walnut shells or emery sand. Or maybe try a variety of suggested stuffings and have a little science experiment of which one kept my needles the nicest over long periods of time. The people of the internet deserve to know what is best!